Quick Overview
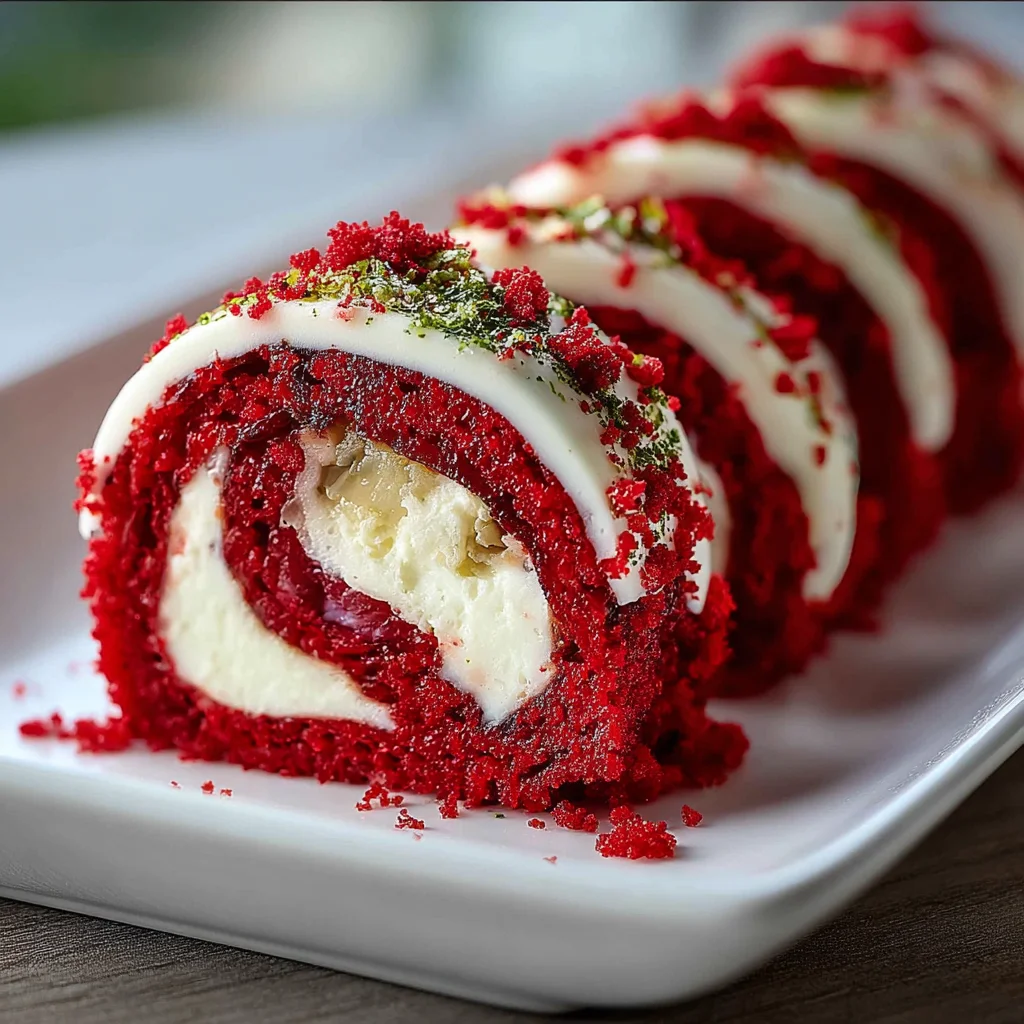
If you’re on the hunt for a unique and visually stunning dessert, look no further than this Red Velvet Cheesecake Sushi Roll Dessert. This delightful combination marries the rich flavors of classic red velvet cake with creamy cheesecake in a fun sushi format. Perfect for parties or special occasions, this dessert is sure to impress your guests while satisfying your sweet tooth. Whether you’re a fan of traditional desserts or adventurous culinary treats, this recipe will delight your taste buds and keep everyone coming back for more!
Ingredient Breakdown
Red Velvet Cake Mix
For this dessert, you’ll need one box (15.25 oz) of red velvet cake mix. This pre-packaged mix provides an easy and consistent base flavor that captures the essence of red velvet without needing to measure out multiple ingredients.
Cream Cheese
Use 8 oz of cream cheese at room temperature. Cream cheese gives the cheesecake filling its signature tangy flavor and creamy texture that perfectly complements the sweetness of the red velvet.
Powdered Sugar
You will need 1 cup of powdered sugar to sweeten the cream cheese mixture. This ingredient dissolves easily and adds a smooth sweetness without any graininess in the filling.
Heavy Whipping Cream
1 cup of heavy whipping cream is essential for creating a light and fluffy texture in the cheesecake filling. Whipping it until stiff peaks form gives volume and stability to your dessert.
Vanilla Extract
Add 1 teaspoon of pure vanilla extract for extra flavor depth in both the cake and filling. The vanilla enhances the overall taste profile without overpowering other flavors.
Edible Decorations
Consider using edible sprinkles or cocoa powder for garnishing. These decorations add visual appeal and can enhance the aesthetic presentation of your sushi rolls.
Step By Step Recipe: Red Velvet Cheesecake Sushi Roll Dessert
Prepare the Cake Base
Start by preheating your oven to 350°F (175°C). Grease a baking pan and prepare according to package instructions for your red velvet cake mix. Pour the batter into the pan evenly and bake for about 25-30 minutes until a toothpick inserted comes out clean. Allow it to cool completely before moving onto assembly.
Make the Cheesecake Filling
In a mixing bowl, combine room temperature cream cheese with powdered sugar and vanilla extract. Use an electric mixer on medium speed until fully blended and smooth. Then slowly add heavy whipping cream while continuing to mix until stiff peaks form. This mixture should be thick but spreadable.
Assemble the Sushi Rolls
Once your cake has cooled, place it on a clean surface or cutting board. Gently spread a layer of cheesecake filling over the top of the cake evenly using an offset spatula, leaving about half an inch around the edges clear. Carefully roll up the cake from one end to create a log shape, pressing gently but firmly as you go along.
Chill Before Slicing
Wrap your rolled cake tightly in plastic wrap or parchment paper. Refrigerate it for at least two hours or overnight if possible; this helps set everything together so it holds its shape when sliced.
Slice into Rolls
After chilling, remove the wrap from your rolled dessert and place it on a cutting board. Use a sharp knife to slice into even pieces about one inch thick; these will resemble sushi rolls. Wipe your knife with a damp cloth between cuts to maintain clean edges.
Serve with Garnishes
Arrange sliced rolls on a serving platter artistically! You can sprinkle edible decorations like cocoa powder or colored sprinkles on top for added flair. Serve immediately for best texture or keep refrigerated until ready to serve.
Serving and Storing Tips
Serve Fresh
These Red Velvet Cheesecake Sushi Rolls are best served fresh after slicing them. The contrast between light cheesecake filling and soft red velvet is most enjoyable when enjoyed right away!
Store Properly
If you have leftovers, store them in an airtight container in the refrigerator for up to three days. This helps maintain their freshness while preventing them from drying out.
Freeze for Later Use
You can also freeze these rolls! Wrap them tightly in plastic wrap before placing them in an airtight container or freezer bag. They will last up to two months frozen but be sure to thaw them overnight in the fridge before serving again.
Pair with Beverages
Consider serving these desserts alongside coffee or tea for an excellent pairing experience! The rich flavors complement each other well while providing balance to each bite you take.
Mistakes to avoid
When preparing a Red Velvet Cheesecake Sushi Roll Dessert, avoiding common mistakes can significantly improve your outcome. One key mistake is not properly cooling the cream cheese mixture. If it’s too warm, it can make rolling difficult and lead to a messy dessert. Allow the filling to chill for at least 30 minutes. Another mistake is using too much liquid in your sushi rice. This can result in a mushy texture, making it hard to roll and slice neatly. Stick to the correct ratio for better results.
Another frequent error is cutting the sushi rolls too soon. Letting them rest for about 10 minutes after slicing allows the flavors to meld and makes each piece more cohesive. Additionally, failing to use a sharp knife can crush your rolls, so ensure that you have a clean, sharp blade ready. Lastly, don’t skip the refrigeration step after assembling; chilling helps set the dessert and enhances its overall flavor.

Tips and tricks
Creating a perfect Red Velvet Cheesecake Sushi Roll Dessert requires attention to detail and some helpful tips. First, when preparing the sushi rice, rinse it thoroughly before cooking. This removes excess starch and prevents the rice from becoming sticky or gummy. Utilize the right type of rice—short-grain sushi rice works best for achieving that desired texture.
For the cheesecake filling, consider adding a splash of vanilla extract or a hint of lemon juice for an extra flavor boost. This will balance the richness of the cream cheese and create depth in your dessert. It’s also beneficial to fold whipped cream into your filling gently; this adds lightness while maintaining a creamy consistency.
When rolling your sushi, use a bamboo mat lined with plastic wrap for easy handling and cleanup. Applying even pressure while rolling helps maintain shape without squishing the ingredients together excessively. Lastly, refrigerate your assembled rolls for at least an hour before slicing; this step firms up your dessert and makes it easier to handle.
Suggestions for Red Velvet Cheesecake Sushi Roll Dessert
To elevate your Red Velvet Cheesecake Sushi Roll Dessert, try incorporating layers of different textures and flavors. Adding crushed nuts like pecans or walnuts inside the roll provides a delightful crunch that complements the creaminess of the cheesecake filling. Consider drizzling chocolate sauce or caramel over sliced pieces for an elegant presentation.
For an added twist, sprinkle some edible glitter or colored sugar on top before serving; it adds visual appeal and makes your dessert stand out on any table. If you’re hosting a gathering, serve these rolls with various dipping options like white chocolate ganache or fruit compote to give guests choices that enhance their experience.
Experimenting with alternative toppings such as fresh berries or coconut flakes can also bring freshness and additional flavor dimensions to each bite of your Red Velvet Cheesecake Sushi Roll Dessert.
FAQs
What are the main ingredients in Red Velvet Cheesecake Sushi Roll Dessert?
The primary ingredients include red velvet cake mix, cream cheese, sugar, heavy whipping cream, sushi rice, and food coloring if desired. These elements combine to create a rich yet light dessert that offers both visual appeal and delicious taste.
Can I make Red Velvet Cheesecake Sushi Rolls ahead of time?
Absolutely! You can prepare these rolls in advance by assembling them and storing them in an airtight container in the refrigerator for up to two days before serving. Just make sure not to slice them until you’re ready to enjoy them for optimal freshness.
How do I store leftover Red Velvet Cheesecake Sushi Rolls?
Store any leftover rolls in an airtight container in the refrigerator. They should remain fresh for up to three days but may lose some texture over time due to moisture absorption from the cream cheese filling.
Can I substitute ingredients in this recipe?
Yes! For instance, you can use gluten-free flour instead of regular flour if you want a gluten-free version of red velvet cake mix. Dairy-free cream cheese alternatives can also work well if you’re catering to lactose-intolerant guests.
Is there a non-baking method for making these sushi rolls?
Yes! You can use pre-made red velvet cake from bakeries or grocery stores instead of baking from scratch. Simply crumble it into small pieces and mix it with cream cheese as instructed in traditional recipes.
What pairs well with Red Velvet Cheesecake Sushi Rolls?
These delicious rolls pair beautifully with beverages like sweet tea or coffee due to their rich flavor profile. Additionally, serving them alongside fresh fruits like strawberries or raspberries adds brightness and balances their sweetness nicely.
Summary
In conclusion, creating a delightful Red Velvet Cheesecake Sushi Roll Dessert involves careful attention to detail throughout preparation and assembly stages. Avoiding common mistakes ensures optimal texture while employing useful tips enhances flavor profiles significantly. With proper storage techniques and ingredient substitutions available, this dessert becomes versatile enough for any occasion—making it not only delectable but also practical!