Quick Overview
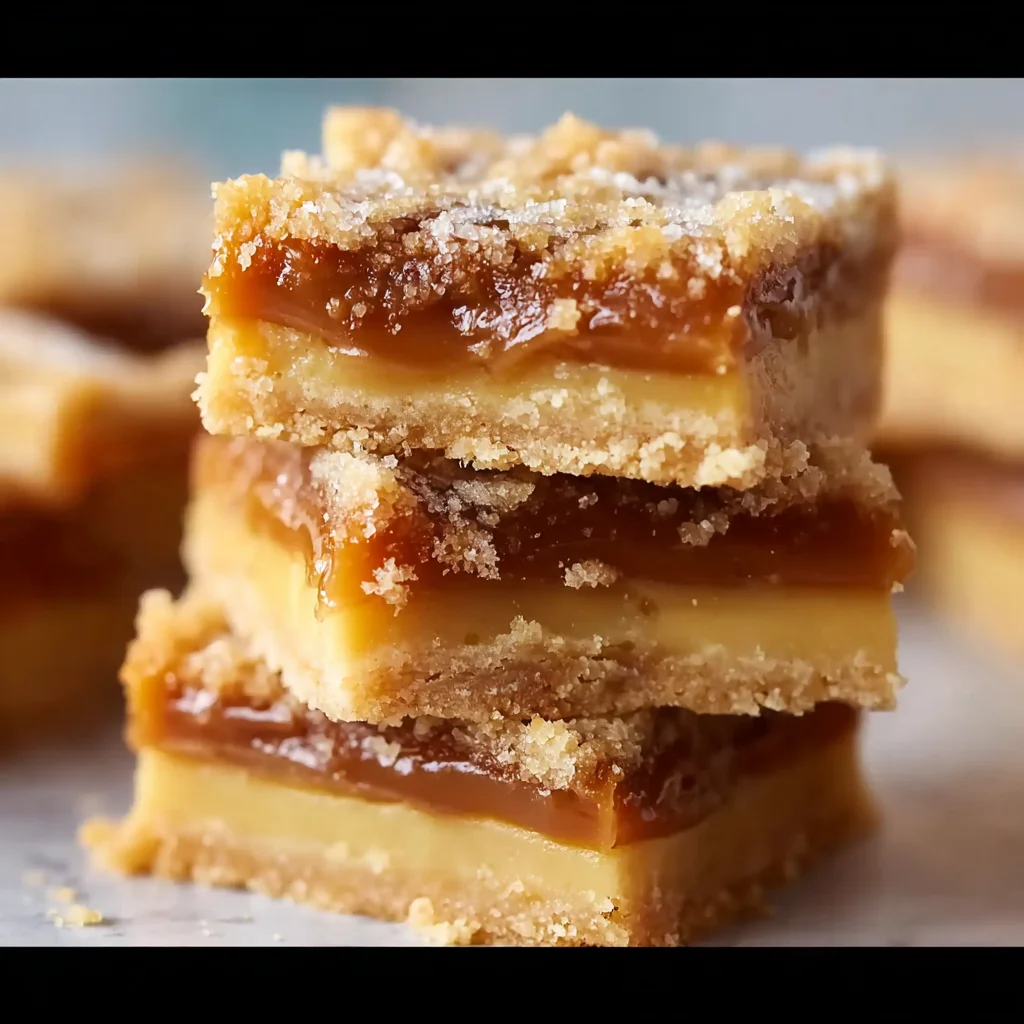
If you have a sweet tooth, look no further than our Salted Caramel Butter Bars. These tasty and irresistible treats combine buttery goodness with rich salted caramel, making them an ideal choice for any dessert lover. Whether you’re hosting a gathering or simply craving something sweet at home, these bars will impress everyone. Their chewy texture and delightful flavor will leave you wanting more!
Ingredient Breakdown
Flour
You will need 2 cups of all-purpose flour for the base of the bars. This ingredient provides structure and stability to the dessert while allowing it to maintain a soft texture.
Brown Sugar
Using 1 cup of packed brown sugar adds sweetness and moisture to the recipe. The molasses content in brown sugar gives it a deep flavor that complements the salted caramel beautifully.
Unsalted Butter
Use 1 cup (two sticks) of unsalted butter, softened to room temperature. This ingredient contributes richness and creaminess to the butter bars, creating a tender crumb.
Granulated Sugar
In addition to brown sugar, include ½ cup of granulated sugar. This helps balance the sweetness while adding a light texture that contrasts nicely with the chewy bar base.
Egg
One large egg binds all the ingredients together. It adds moisture and creates a cohesive structure for your salted caramel butter bars.
Salt
Add ½ teaspoon of sea salt to enhance the flavors of the other ingredients. The salt works harmoniously with the sweetness of both the dough and caramel, providing that perfect contrast.
Vanilla Extract
Incorporate 2 teaspoons of pure vanilla extract for aromatic flavor. Vanilla elevates the overall taste profile of your bars and pairs perfectly with caramel.
Caramel Sauce
Use 1 cup of store-bought or homemade salted caramel sauce for drizzling over the top. This sauce is what makes these butter bars truly irresistible!
Step By step Recipe : Salted Caramel Butter Bars : Tasty & Irresistible
Prepare Your Baking Dish
Preheat your oven to 350°F (175°C). Grease a 9×13-inch baking dish with cooking spray or line it with parchment paper for easy removal later on. This ensures your salted caramel butter bars come out perfectly every time.
Mix Dry Ingredients
In a large mixing bowl, whisk together the flour, brown sugar, granulated sugar, and salt until well combined. This step evenly distributes all dry ingredients ensuring consistency in flavor throughout your butter bars.
Cream Butter and Sugars
In another bowl, beat the softened unsalted butter with the sugar mixture using an electric mixer until light and fluffy. This process takes about 3-4 minutes and incorporates air into your batter for a lighter texture.
Add Egg and Vanilla
Once your mixture is fluffy, add in one egg and vanilla extract. Mix on low speed until just combined; be careful not to overmix at this stage as it can lead to denser bars.
Combine Wet and Dry Mixtures
Gradually add your dry mixture into the wet mixture while mixing on low speed. Stop once everything is just combined; you want a thick dough texture that holds together but doesn’t become overly smooth.
Spread Dough into Baking Dish
Transfer half of your dough into the prepared baking dish using a spatula or your hands to spread it evenly across the bottom. Press firmly so that it forms a solid base for your delicious salted caramel filling.
Add Caramel Layer
Drizzle one cup of salted caramel sauce evenly over the pressed dough layer in your baking dish. Feel free to use more if you prefer an extra gooey finish! Just make sure not to spill too much over edges as it may burn during baking.
Crumble Remaining Dough
Take small pieces of remaining dough (the other half) and crumble them over the top of your caramel layer evenly—this creates that crumbly top layer that balances out each bite beautifully.
Bake Your Bars
Place your baking dish in preheated oven and bake for approximately 25-30 minutes until golden brown around edges but still slightly soft in center when touched gently—this indicates they’re done yet still chewy!
Cool Before Serving
Remove from oven and allow cooling completely in pan on wire rack; this will take about an hour or so before cutting into squares can begin without making a mess!
Serving and Storing Tips
Serving Suggestions
Cut your cooled salted caramel butter bars into squares or rectangles based on personal preference! Serve them warm with whipped cream or alongside vanilla ice cream for an indulgent treat everyone will love!
Storage Guidelines
To store leftovers properly, keep them in an airtight container at room temperature for up to three days or refrigerate for up to one week! You can also freeze them wrapped tightly in plastic wrap if you’d like longer-term storage options available!
Mistakes to avoid
One common mistake when making Salted Caramel Butter Bars is overcooking the caramel. Caramel should be cooked until it reaches a golden-brown color, but if you cook it too long, it can become bitter. To avoid this, keep a close eye on the mixture and use a candy thermometer to check for the right temperature.
Another mistake is not allowing the butter to soften before creaming it with sugar. Softened butter incorporates air more effectively, resulting in a lighter texture for your bars. If the butter is too cold, you won’t achieve that fluffy consistency needed for perfect Salted Caramel Butter Bars.
Additionally, using the wrong type of salt can affect flavor balance. Opt for sea salt or kosher salt rather than table salt. Table salt has finer granules and could overpower your dessert. A sprinkle of coarse sea salt on top enhances the flavors without overwhelming them.
Lastly, skipping the chilling step can lead to gooey bars that are hard to cut. After baking, let your bars cool completely in the pan before slicing them into squares. This ensures they hold their shape and makes serving easier.

Tips and tricks
For successful Salted Caramel Butter Bars, consider using high-quality ingredients. Choose unsalted butter for the base to control the amount of salt in your recipe. Using pure vanilla extract instead of imitation can significantly enhance flavor, making your bars taste richer and more satisfying.
Timing is also essential when preparing these delicious treats. After baking the crust layer, let it cool slightly before adding the caramel topping. This prevents the caramel from melting into the crust, which keeps layers distinct and enjoyable.
When drizzling salted caramel over your bars, allow it to cool slightly but remain pourable. If it’s too hot, it may run off or melt into the bars, while cooled caramel will create an attractive layer that complements each bite perfectly.
To make cutting easier, use a sharp knife dipped in hot water before slicing through your cooled bars. Wipe the knife clean between cuts for neat edges. This simple trick ensures that every piece looks appetizing and maintains its shape.
Finally, store any leftovers correctly to maintain freshness. Place them in an airtight container at room temperature for up to three days or refrigerate them for longer shelf life. Just remember to bring them back to room temperature before serving for optimal flavor and texture.
Suggestions for Salted Caramel Butter Bars: Tasty & Irresistible
Pair your Salted Caramel Butter Bars with a scoop of vanilla ice cream for a delightful dessert experience. The creamy texture of ice cream balances well with the rich caramel flavor and buttery crust.
Consider serving these bars with fresh fruit such as sliced apples or pears on the side. The natural sweetness and crispness of the fruit provide a refreshing contrast that complements each bite of rich caramel goodness.
If you want extra flair, top each bar with chopped nuts like pecans or walnuts before baking. Nuts add a crunchy texture that contrasts beautifully with soft caramel and buttery layers below.
For an added touch of elegance, drizzle melted chocolate over your cooled bars after they have set completely. Dark chocolate pairs wonderfully with salted caramel and can elevate your dessert presentation significantly.
Lastly, try experimenting with flavored salts such as smoked sea salt or flavored finishing salts to give your bars a unique twist that tantalizes taste buds in unexpected ways.
FAQs
What are Salted Caramel Butter Bars?
Salted Caramel Butter Bars are delectable treats featuring a buttery base topped with rich salted caramel sauce. They are easy to make and perfect for sharing at gatherings or enjoying as a sweet snack at home.
How do I store Salted Caramel Butter Bars?
Store your Salted Caramel Butter Bars in an airtight container at room temperature for up to three days or keep them refrigerated for about one week. Be sure to separate layers with parchment paper if stacking them to prevent sticking.
Can I freeze Salted Caramel Butter Bars?
Yes! You can freeze Salted Caramel Butter Bars by wrapping them tightly in plastic wrap followed by aluminum foil or placing them in freezer-safe containers. They will stay fresh for up to three months; just thaw at room temperature before enjoying.
Can I use brown sugar instead of white sugar?
Absolutely! Using brown sugar adds moisture and depth of flavor to your Salted Caramel Butter Bars. The slight molasses flavor from brown sugar pairs beautifully with caramel’s sweetness.
What type of salt should I use?
For best results, opt for flaky sea salt or kosher salt over table salt when making Salted Caramel Butter Bars. These types offer better flavor balance and texture without overwhelming sweetness compared to finer table salt.
How can I customize my salted caramel bars?
You can customize these bars by adding different flavors like espresso powder or almond extract into the batter or by mixing in chocolate chips before baking! Toppings like crushed cookies or sprinkles can also add fun textures and colors.
Summary
In summary, creating perfect Salted Caramel Butter Bars involves avoiding common mistakes like overcooking caramel and ensuring proper ingredient quality. Utilize helpful tips such as cooling times and storage methods for optimal results. Consider pairing suggestions that elevate this already delicious treat further while addressing frequently asked questions surrounding preparation and variations enhances understanding among budding bakers.